The 1899 Locomobile Steam Car Replica, known as the Lykamobile is a full scale live steam automobile manufactured in 24 kits. This kit is available from a company called "Steam Traction World" located in Daventry, United Kingdom. Each kit is to be manufactured and sent once a month for 24 months. However for cost considerations I have chosen to have my kits batched and dispatched in larger crates to the United States (Topsail Beach, NC).

Specifications:
• Length 7ft 2.6in • Height 5ft 3in • Width 4ft 7.1in • Weight 904 lbs.• Water Tank Capacity 12 Gallons • Fuel Tank Capacity 7.3 Gallons

Construction:

CHASSIS Tubular steel fabrication, combination weld, bolted and silver solder.
STEERING “Ackerman” design tiller steering.
DIFFERENTIAL & DRIVE Spur gear differential similar to the original Locomobile, drive shaft and bearings.
WHEELS & TYRES Single tube pneumatic, treaded.
BREAKING SYSTEM Disc brake system.
ENGINE 21/4" diameter, 3" stroke modified “Hackworth” valve gear.
WATER FEED Twin mechanical pump.
BURNER Fuelled by diesel.
BOILER Multi Fire Tube, fully constructed and complete with necessary paperwork and inspected by notified body.
BODYWORK & SEATS Wooden with steel frame, seating capacity of 2 persons, with turned decorative spindles with leather style upholstery.
Gears: forward and reverse.
Assemble with hand-tools only
Step-by-step instructions
Technical service and help-line backup
Designed on ‘Solidworks’ CAD
Manufactured on modern CNC machines for build accuracy and high quality


Saturday, March 28, 2020

Trim and Louvers Part 2

Well I have waited as long as I could to work out the details of how I want the Lykamobile to look in regards to the trim and louvers. It appears that Steam Traction World may at a later date provide some of this, but with no real definition or timing and possibly with additional cost. I have held off painting the sides of the wood body, thinking that if I wanted wood louvers it must be glued on unpainted wood. Now that the final kits are in sight, it is time that I take this on. Earlier I made a post concerning the trim and louvers, click the following link to review Trim & Louvers if desired. I have decided to follow the plans as best as I can, making adjustments for our "replica". Below if you zoom in a bit on the image, you can see my pencil markings on the side of the panel indicating my plans.
The original Locomobile design called for 7 louvers at 1.5 inches high. I am going with 8 louvers at 1.5 inches high for a better look. 7 louvers didn't look right. I attempted to make the louvers on my table saw, with less than desirable results. The angle of cut is about 5 degrees, the widest portion of the louver will be 3/16 of an inches tapering to 1/16th. At this point "I call a friend". My friend is a master cabinet maker. He has made several items for me over the past couple of decades for our business. At his shop we do a little prototyping, figuring out exactly the set-ups before we use "real" wood. We first figure out how to make the 5/16 inch rounded bead. Here Leslie is ripping a piece and then using a router forming the rounded bead.

Next we decide that we will make a wider piece that we will bend about the contour of the side panel edge. We believe we will ultimately have to soak the wood and make a form and clamp the wood to set the shape. These pieces will be glued and pinned to the side panel. 

Next we prototype the louvers. Here Leslie is cutting the angle of the louver.
We made a few just to see how they looked.

And we mitered the ends at 5 degrees to be parallel to the side panel's edge. 
Below are the finished louvers (they haven't been mitered with the 5 degree ends yet in this image)
Next is to make the more complicated features as shown in the sketch below.
Here Leslie (with Dean looking on) are making the curved 5/16th inch bead.

This piece will be routed to make the round 5/16" bead. It will be blended with the circular dot and bead.
Making the rounded 5/16" bead with a router wasn't too difficult, but it was a two man operation.


All taped up for pre-fit before final gluing etc.
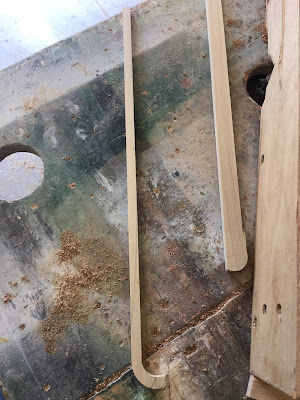
Next was the making of the trim piece that will be attached to the edge of the side panel. We decided to use white oak. The trim was made with the rounded bead with the router and then soaked overnight in water inside this piece of 3 inch pvc pipe. The ax stuffed in the top is there to hold the pieces from floating up.
Leslie made a form from the side panel to allow us to clamp the trim piece. Dean is using a heat gun to heat the trim piece while Leslie uses the clamps to gradually form the trim piece.


This rig will be left to dry out completely in the sun and overnight.
Here Leslie is belt sanding the now formed trim piece to smooth out the areas where the clamps disrupted the oak a bit.
And the final piece ready for assembly on the side panel.
Next we begin the gluing and assembly of the louvers. First the glue and then pinning the louver with a very thin pin. We discovered later during the drying of the glue that at the thinnest section of the louver it wanted to curl a bit, so we had to go back and pin the louvers further on the edges and the thin sections.


After finishing all of the louvers on this side panel (note that the other trim pieces have been glued on this side panel - didn't get any pictures on this one), now comes the more hard part - gluing the formed trim.
We have to utilize some clamps - even though we formed this piece it still had some memory. We also had to pin the piece with the clamps to allow a close fit for the glue.


Now on to the second side panel. As you can see some of the trim was already glued and pinned before I got to Leslie's shop that day.
The following shows the gluing and pinning of the vertical piece.


Here you see Leslie making a few finishing touches to the round dot with sandpaper.
The next few images shows the gluing and pinning of the second side panel's louvers. Notice that we temporarily pin a few guide pieces to help the aligning process of the louvers.


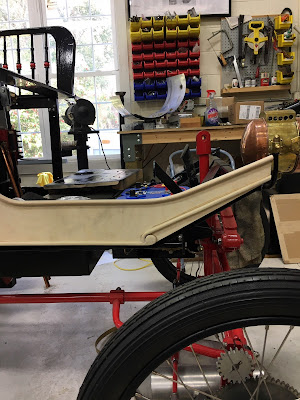
We repeat the same procedures again for the bent trim piece. Below are images of the final product temporarily mounted on the Lykamobile.


Finally I am now able to figure out the placement of my side carriage lamps. This I needed to do before final painting of the sides. All in all I am very pleased with the craftsmanship that Leslie and Dean provided. This work was a little outside their wheelhouse, but they too said they enjoyed working on my project.
Next steps will be priming and final paint for the side panels. Unfortunately with this pandemic, the delivery of my kits have taken a back burner - which is understandable. The next two kits are ready for shipment, as some "local" builders (UK and EU) have already received.

Popular Posts