With this kit we will finally place the boiler on the chassis and begin the process of insulating the boiler, burner tray and smoke hood. Unfortunately I will only be able to mount the burner tray under the boiler due a redesign of the "Stays" that holds the burner tray up to the boiler. This will be further explained later in this post. But first various pipe fittings need to be placed on the actual boiler. Below I have gathered the various parts for the underside of the boiler.
These fittings are temporarily mounted on the boiler so that their angular orientation passing through the burner tray parts can be determined. Below are pictures of the boiler orientated upside down for this work and the burner inner tray placed on top to align the pipe fittings.
At this point I mark the outer rim of the boiler on each side of the protruding pipe as an alignment guide for the permanent fitting of the pipes. Next I use the Steamseal compound to help seal the fittings and tighten all the fittings tight on the bottom of the boiler.
Now I gather all the parts for the top of the boiler.
It can't be seen in the below picture, but the boiler is sitting on a dolly that keeps the installed fittings from being damaged.
Again I loosely fit all of the fittings on the top of the boiler and place the inner smoke hood loosely on top of the boiler to orientate the fittings.
This time I mark the pipe locations with a paint pen on the outer boiler edge. Again I use the Steamseal on the fitting threads and fit them to the boiler.
Now comes the exciting part - placing the boiler into the chassis. I made a boiler platform out of rectangular tubular steel to be used with my engine hoist. However the platform must be oriented in one precise way that allows the platform to pass through the frame that ultimately holds the boiler.
Steam Traction World instructs that the front of the boiler must be tilted up to allow the burner tray assembly to pass over the hand brake bracket. I place a 1 inch x 1 inch tubular steel piece on the forward mounting flange to accomplish this in a safe manner.
The boiler is resting on the three mounting flanges with the tubular steel section keeping the boiler elevated for later fitting of the burner tray.
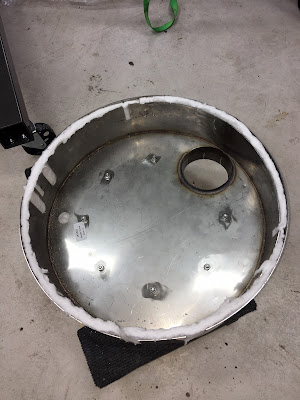
Next is the assembly of the inner and outer burner tray with the superwool insulation. First I mount the spacers on the outer side of the inner tray.
Then I place the superwool insulation in the inner side of the outer tray.
Next I place the inner tray into the outer tray and install some superwool that I thought was the correct piece.
The above piece of superwool is not the correct piece. There was no diagram given in the instructions, so it was sort of a puzzle figuring our what pieces went where. Below are the correct pieces. I had to use a paint stirring stick to help slide the superwool into the inner and outer burner trays.
The use of a tapered alignment tool was required to manipulate the sheet metal to allow for the superwool to slide into the opening. It was also useful for fitting the bolts into their holes too.
Finally the last sheet metal part is fitted. I'm adding split lock washers where I can to help secure the nuts and bolts from becoming loose through any vibrations that might occur under steam power.
Next is the placement of the burner tray under the boiler. To help protect the paint finishes, I use some wool mat over the rear and a piece of heavy cardboard on top of the handbrake bracket.
The burner tray assembly is slid into place, resting on the handbrake bracket and the rear-end.
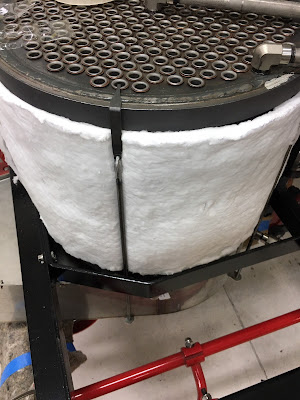
Next is placing the superwool insulation around the boiler and fixing it in place with the boiler Stays. These are the rods that are hung on the boiler, pass through the three boiler support mounting flanges and through the burner tray mounting brackets. An M6 nut is used to lift the burner tray up and against the underside of the boiler.
When raising the burner tray to the boiler by screwing the M6 nuts up, care must be taken to make sure the burner tray slips inside the boiler inner ring. Because sheet metal fabrication can be imprecise, the burner tray needs to be pushed, beat, cajoled into submission with my plastic hammer, various flat bars etc. The below pictures shows where the parts must slip to be fitted properly. This is looking up at the bottom side of the boiler.
Don't try to just use the M6 nuts to compress the burner tray into the boiler. The Stays are very weak and will bend. This is the part that Steam Traction World is redesigning to be more structurally sound. Next I place the two front boiler cladding pieces for trial fitting.
Next I place the inner smoke hood on top of the boiler for fit.


The inner smoke hood is supposed to slip down over the outer diameter of the boiler. Again because this is a sheet metal fabrication, the smoke hood is not very round and much time was expended manipulating the smoke hood over the boiler. It is a fairly tight fit. I also had to widen a few of the pipe slot clearances by using a Dremel tool fitted with an abrasive cutting disc to slice off additional sheet metal for clearance. Once satisfied with the pipe slot clearances, I tap the inner smoke hood over the boiler with my plastic hammer using a few small screw drivers as guides or shims to help align the sheet metal over the boiler flange. Now it is time to work on the outer smoke hood. I mount a few of the spacers that hold the inner and outer sheet metal apart for the superwool and fit the outer smoke hood onto the inner smoke hood on the boiler. Many of the pipe openings had to be enlarged. It appears that the pipe clearances were cut for the pipe diameter, however (at least for my kit) I need clearance for the elbow fittings. So again I use my Dremel to cut away the sheet metal to get the clearance that will be needed.


Satisfied now with the clearances, I can assemble the two smoke hood pieces and superwool insulation. Below is a picture of the spacers mounted on the inside of the outer smoke hood.
The superwool insulation is placed inside the outer smoke hood.
I then use cellophane tape to fix the superwool insulation around the outer circumference of the inner smoke hood.
This is then slipped inside the outer smoke hood and M6 nuts and split washers are used to complete the assembly.
This is as far as I can go until I receive the new and improved redesigned 'Stays' that Stem Traction World has promised. To continue assembly of all the outer sheet metal cladding would be wasted effort because they would have to be disassembled to replace the redesigned 'Stays'. Once I receive the 'Stays' the final assembly will be covered in Lyka Kit #18 Cladding and Burner Tray Part 2. Below are a few pictures of the partial completion of kit #18 and the Lykamobile.


Thanks for publishing the pics of the boiler assembly. They will help a lot when I start on mine. I have decided to wait until I have all the bits to complete this section of the build before starting. I had hoped that we might have all the bits by Easter 2020! The delivery delays and general lack of progress have sapped both my head of steam and enthusiasm! Hence I have mad no additions to my own build blog for some time. Keep up the good work, we'll get there if it kills us, and it probably will at this rate.
ReplyDeleteHello Grier, Thank you for your excelent blog with the perfectly detailed Photos of the boiler installation.
ReplyDeleteI bought and built a Likamobile I in 1999, had lots of problemms getting it finished, however after aprox. one year it was running OK. It was geat fun building it!
Since 2017 the boiler has started leaking and I have had it re-welded two times and now it's leaking a third time. STW have promised me a replacement boiler like the one in Lykamobile II. I had various discussions on the Telephone with Dean at STW about a new boiler and I understood that as the new boiler is larger I would have to make the original Chassis wider to accomodate it. I have just rang STW and asked them to send me the dimensions and weight of the boiler.
Do keep your excelent blog running and I wish you good health and lots of fun with your Lykamobile II.
Regards, Charles
Hello Charles,
DeleteI just noticed your comments. If you need any dimensions concerning the chassis or boiler, I would be happy to help.
Just ask!
Best Regards,
Grier
Hallo Grier, thank you for reply which I found by chance on your Blog. Yes please send me the dimensions and wieght of the new boiler.
ReplyDeleteI'm trying to have my old boiler repaired again, hope it works!
Regards, Charles